
You show up for a site visit. The client asks what was done to the big oak last season – trimmed, cabled, or just assessed? You check your notes. Nothing. You ask the office. They pull up an old invoice with a line that says “Tree pruning – $280”. Which tree? Nobody knows.
This is the gap most tree care companies live with: trees get documented separately from the work, or not documented at all. Estimates, invoices, and field notes exist in different places, connected only by memory and luck.
ArboStar closes that gap with Tree Inventory – a built-in system where each tree on a property is a permanent record, tied directly to every estimate, job, invoice, and field report it’s ever part of. This article walks through how it works, step by step.
A Tree Is a Record, Not a Pin
Before getting into the workflow, it’s worth understanding what a “tree” actually is inside ArboStar – because it’s different from what most companies are used to.
In most software, a tree is a line item. You write “Pruning – Red Maple, front yard” in an estimate, and that’s it. Next season, you write it again. There’s no connection between the two.
In ArboStar, a tree is a long-lived object. It has a unique Tree # that never changes, a fixed position on an interactive satellite map, and a set of details: species, condition, notes, photos, and any custom fields your company configures. It exists independently of any specific job.
That same tree can appear in dozens of estimates over the years. It accumulates a complete history of every service ever planned or performed on it. When you open that tree’s record next season, you’re not starting from scratch – you’re picking up where you left off.
That’s the core idea. Everything else in Tree Inventory follows from it.

Step 1 – Mapping the Property
The first step is documenting the site – and this can happen before any estimate exists.
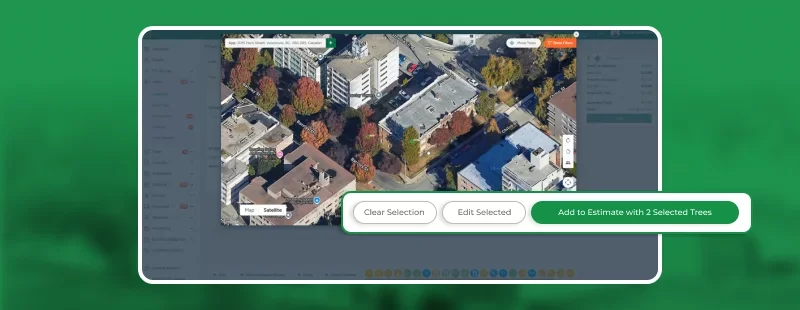
From a client’s profile, you open the Tree Inventory Map. You’re looking at an interactive satellite view of the property. Double-click anywhere to place a tree, fill in its details, add photos if you have them. Each tree becomes a colored pin on the map, with the color determined by species – so on a large commercial property, you can see at a glance where the maples are, where the oaks are, where the stumps are.
A few tools make this faster on bigger sites. You can select multiple trees at once – hold Ctrl and click, or drag a rectangle around a section of the property. If you’re dealing with a row of identical trees, clone one and place copies across the map in seconds. For complex sites like parks or HOAs, you can upload a site plan as a map overlay, so tree placement matches the actual layout.
One client can have multiple maps – useful if they manage several locations or if you want to divide a large property into zones.
The important thing: none of this requires an estimate. You can document an entire property on the first visit, build out the full inventory, and have it ready before you write a single quote. When estimate time comes, the groundwork is already done.
Step 2 – From the Map Into the Estimate
When you’re ready to build an estimate, trees come in from the map – not typed in by hand.
Inside the estimate, click + Trees. The Tree Inventory Map opens. You select the trees you want to include. You assign services to each one – pruning to tree #4, removal to tree #7, cabling to trees #12 and #13. Then you return to the estimate.
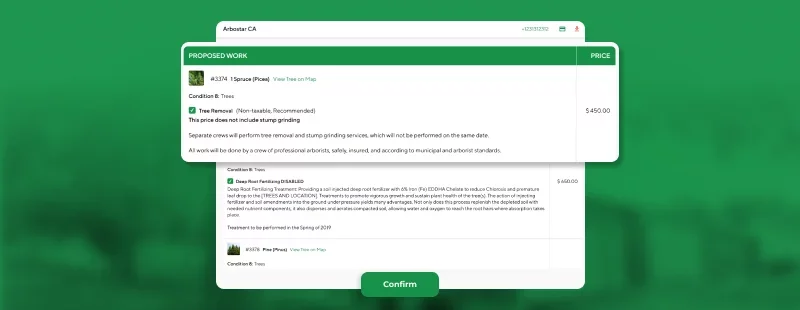
A Trees block appears, separate from the standard services section. Each tree is listed with its details, its assigned services, and their prices. The client sees exactly which tree each service applies to – not a generic line item, but a specific object on a specific property.
Here’s what makes this practical: that same structure carries forward automatically. When the estimate is approved and becomes a workorder, the Trees block is there. When the workorder becomes an invoice, the Trees block is there. Nothing gets re-entered. The tree-to-service connection you built in the estimate stays intact through the entire job cycle.
Two systems working side by side, not a tree list bolted onto the side of your existing process – one workflow from first quote to final invoice. ArboStar’s estimating tools are built around this structure.

Step 3 – In the Field, Tree by Tree
The crew arrives on site. They open the job on the ArboStar mobile app.
The job screen shows the Trees block with every tree assigned to this job and every service under each one. Before work starts, it’s read-only – the crew reviews the plan. Once they tap Start Work, checkboxes activate.
They work tree by tree. Finish the pruning on tree #4 – check it off. Move to tree #7, complete the removal – check it off. The map updates in real time: completed trees shrink and turn red, pending trees stay full-size and green. At a glance, anyone on the crew can see what’s done and what’s left.
When the last task is finished, the crew taps Finish Work. Before the job closes, they’re required to submit a report for every service – a field note and photos for each tree, each task. The job literally cannot be completed without this documentation.
This isn’t extra paperwork. It’s what makes the history tab useful next season.
Step 4 – What the Client Sees
Clients get access to estimates and invoices through the ArboStar Customer Portal. When a document contains trees, the Trees block is visible there too – each tree with its details and assigned services.
-
Every tree has a View on Map button. The client taps it and sees an interactive map of their property, with pins for every tree in the document. They can tap each pin to see what was planned or what was done.
-
The same structure appears on PDFs: a Trees block with per-tree service breakdowns, plus a map snapshot with numbered pins.
-
You control exactly what clients see. Through Company Management, you can set which tree fields are visible in the portal and on PDFs – species, condition, notes, or just the Tree # and services. The level of transparency is yours to decide.
In practice, clients who receive this kind of estimate ask fewer follow-up questions. The work is laid out clearly, connected to real objects on their property. That’s not a small thing when you’re trying to close a job or justify a price.
Tree History – Value That Compounds Over Time
Every tree has a History tab. It shows a complete, chronological log of everything that’s ever happened with that tree: when it was created, when its details changed, every estimate it appeared in, every job performed on it, every invoice issued, every field report submitted.
The history is read-only and global – it spans the entire relationship between your company and that tree, across all jobs and all seasons.
The practical use case is simple: next spring, before you write a new estimate for a property, open a tree and look at its history. See what was done last year, what was recommended but declined, what the field crew noted in their report. You’re not starting from scratch – you’re building on a documented record.
When a client calls and asks what was done to their birch three years ago, the answer is one click away.
The longer you use Tree Inventory, the more valuable it becomes. A company that’s been maintaining a property for five years has five years of tree-level history. That knowledge is a competitive advantage – it lets you sell recurring maintenance, catch problems early, and talk to clients with specifics instead of generalities.
One Tree, Start to Finish
Tree Inventory isn’t a separate module you use for documentation and then abandon when the real work begins. It’s the thread that runs through everything – from the first pin on the map to the field crew’s closing report to the invoice the client approves in the portal.
Each tree is a living record. It holds the history of every decision made about it, every service performed on it, every note left by the crew. That record doesn’t reset between jobs or between seasons.
For companies that manage recurring clients, large properties, or multi-year contracts, that continuity is what turns a tree care business into a professional operation.
Want to see how it works on a real property? Explore ArboStar’s tree mapping tools or book a demo to walk through Tree Inventory with your own workflow.